Help, I’m Stuck!: A Basic Guide For Carabiner Care.

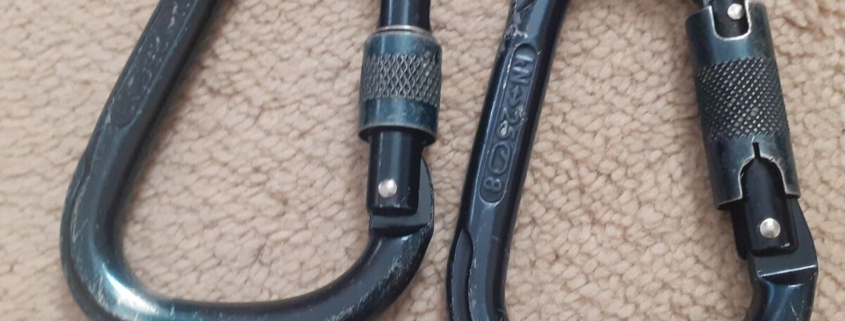
Carabiners play a vital role in any tree climber’s kit, serving as the linchpin that connects various elements of the climbing system. Whether you’re a seasoned climber or a beginner eager to get off the ground, developing an understanding of how to properly use, maintain, and care for your climbing carabiners is crucial for safety and performance. In this blog, we’ll delve into the intricacies of these vital pieces of kit, and it will apply to both climbing carabiners and rigging carabiners.

As you may already know, it is recommended to inspect your equipment every time before going aloft, especially if the equipment hasn’t been used in a while. Here are a few things to look for during the inspection process:

  • Visually inspect the carabiner’s body for abrasion, sharp edges, excessive wear, corrosion, or deformation. An aluminum carabiner that has been exposed to extreme rigging forces or when used for wild mechanical advantage configurations can begin to “stretch”.
  • Be on the lookout for burrs, these little imperfections can happen quite easily and can damage your rope.
  • Hairline cracks can be found in carabiners and can reduce carabiner strength, however spotting that defect might require closer attention, so bust out those bifocals!
  • Lastly (for the visual inspection), make sure the rivets are still intact and in good condition.


Following the visual inspection, proceed to the functions test, which will include the following:

  1. Open the carabiner gate all the way to the spine without excessive force and allow the gate to close without any interference from the fingers. If your carabiner opens offset of the spine, don’t worry. Certain carabiners are designed to open that way.

    • During this step, you can also check the alignment of the nose and the nose slot on the barrel of the gate.
  2. Next – open the gate just slightly before the half-way point and, without interference, allow the gate to close on its own.

    • During this step, while the gate is open, gently wiggle the gate and look for excessive movement.
  3. Lastly – open the gate to half-way across the nose and release the gate. It should automatically close.

If at any point the gate does not automatically spring toward the nose, the gate does not close, or if there sounds like there’s sandpaper scratching on the inside; it is time to clean the carabiner.

Clean and Lubrication

Follow these simple steps to get that carabiner shiny once again:

  1. Remove the loose excess dirt/debris from the carabiner.
  2. In a container, fill it with lukewarm water and add neutral ph detergent.
  3. Proceed to submerge the carabiner in the cleaning water, open and close the gate to work the muck out of the barrel.
  4. Once you believe the muck is removed from the internals, dump the grimy water from the container and refill it with clean water. Continue to open and close the carabiner in order to completely flush out any cleaning solution left in the barrel.
  5. Drying out the carabiner is simple; hang dry the carabiner or to speed up the process, use compressed air set to the lowest pressure possible and carefully blow the barrel dry. If too high of pressure is used, the internal springs may become damaged and will cause you to retire the carabiner. Hang the carabiner with the gate opening facing upwards, this way the barrel containing the spring is able to drain out.
  6. Lubricate only when the carabiner is completely dry. Most manufacturers will recommend using Duck Oil or 3-in-1; stay away from WD40 and dry graphite powder as they are not truly lubricants. The dry graphite powder may collect and build up debris, making it a meticulous cleaning.
  7. Most carabiners will have three different springs working the barrel/gate. To hit the rotation spring, sparingly apply (the correct) lubrication to the small opening of the barrel towards the gate opening.

    1. Next, we’ll hit the compression spring. At the hinge, we’ll pull the barrel away from the hinge and lubricate. We will do this on both sides, and we’ll also lubricate the hinge while were there.

    2. Finally, we’ll rotate the barrel in order to access the innermost compression spring and lubricate as well.

  8. At this point, wipe away any excess lubrication and repeat the functions test. If any flaw is still present, hate to say it but it’s time to retire said carabiner.

Some people wonder how to fix a carabiner. If you notice damage in your carabiner, you need to retire it. It is unsafe to attempt to fix or repair an arborist carabiner.

Bartlett Arborist Supply has a wide selection of carabiners when you need to replace your current carabiner. We also can recommend what carabiner you need for the job.

Take care of your equipment and it will take care of you. I do understand that certain environments will degrade our tree climbing carabiners no matter how delicate we may be with our equipment, but that is no reason to skimp on performing gear inspection. Climb safe!

A Tale of Two Hitches | Taut-Line & Blake’s Hitch

As arborists, we find ourselves suspended amidst the branches, entrusted with the care of trees that have stood the test of time. But it’s not just my harness that keeps us safe; it’s the hitches that have evolved over the generations, each with its own story. In this blog, we’ll journey together through the histories of the two hitches that have helped spark the evolution of hitches: the Blake’s Hitch and the Taut-line Hitch.


Taut-line Hitch: Anchored in Tradition
Before the glorious modern arboriculture era that we are in today, the Taut-line quietly existed in various forms across cultures and industries. The Taut-line hitch has similar counterparts that can be found under the names: Rolling Hitch, Magnus Hitch, Rigger’s Hitch, or as mentioned in the Ashley Book of Knots: The Midshipman’s knot. Earlier mentions of this hitch can be traced back to Howard W. Riley’s Knots, Hitches and Splices book, which was published in 1912. Get this; the Taut-line has so many uses that even astronauts used this hitch during the second space shuttle mission to repair the Hubble Space Telescope! And before that, the Boy Scout Handbook includes the Taut-line hitch in its fifth edition, published in 1948.


Climbing with the Taut-line.
I’m pretty sure it’s a rite of passage in the tree care industry to start with a Taut or Blake’s Hitch; this way we are familiar with how to “self-bail” in the event of system failure or having forgotten equipment. But that could just be me beginning to show my age as there have been skyrocketing advancements in Arboriculture! I didn’t get the pleasure of climbing on hemp rope with the Taut-line, but I have heard that it was interesting until the rope is broken in. The Taut-line gained the reputation of “rolling out” as we moved in the crown of the tree and if you didn’t have that stopper knot at the end of the Taut, it could spell disaster. Wait, here’s a good one; having craved the need for speed, we used to remove a wrap, so instead of two-over-two, we used to tie it with one-over-two… DO NOT DO THIS! Later I came to find out, that this is what everyone called “The Sui-slide” (suicide slide) and that it was frowned upon. Why was the wrap removed, you might ask? The Taut-line was prone to binding.


Blake’s Hitch: A Climb in Modernity
Okay dig this; Heinz Prohaska first described the Blake’s Hitch in a periodical, in the year 1981 and then again in the Nylon Highway in May 1990. Soon after, 1994, Jason Blake separately created the knot, and he eventually published his discovery in a letter to Arbor Age magazine. As you can imagine, this took the Arborist world by storm and the name “Blake’s Hitch” was coined! This didn’t come without the standard backlash as it was something new to the industry and the Taut-line was tried and true for the moment. When those that were reluctant to try heard the rave about the Blake’s hitch, it was too tempting not to give it a shot! Continuing my conversation with those that were around when it was taking the industry by storm; it was mentioned that the Blake’s Hitch felt almost mechanical, it was so smooth! The Blake’s Hitch wasn’t prone to binding like the Taut-line, making it an instant favorite.


Double Blake’s
Have you heard of the Double Blake’s climbing technique? If you haven’t and you’re a diehard of the Blake’s Hitch AND would like to make your Blake’s self-tending; this is the technique for you! In addition to becoming a self-tending system, there is no need for additional gear, which is great news for many of us. Follow these steps and presto!

Tie your traditional closed system and leave a longer than normal tail end on the Blake’s Hitch.
Use the tail end of the Blake’s and tie another Blake’s onto the standing/termination leg the rope. Make sure to button up the system, load test on the ground, and adjust the bridge to the desired length. The bridge in a closed system dictates how much you gain on an ascent.
Begin climbing!

Friction Savers | Which is best?

Which is best?

In today’s climate, there’s a plethora of versions of the same product, and although they are meant for the same purpose, the question(s) remains: Do they function the same way, how versatile is one versus the other, and how much? In this blog we’ll plunge into various friction saver models and which may be best suited for your needs! Because, believe it or not; the decision to choose one over another can rack one’s brain, and down the road you may find out that you dislike what you have chosen.


Where did the concept come from?

Trekking the internet can lead down multiple rabbit holes, but I was able to find that the friction saver was created overseas and first shown publicly at a European conference sometime in the WAY early 90’s. This climber then brought it to the U.S. for a tree climbing competition, sparked the spread of its popularity. While yes, others have claimed to have thought of it first, it has proven difficult to show concrete evidence as to WHO thought of it first. BUT, one thing is true about friction savers; they have cemented themselves in our industry as a staple!


Teufelberger Fimbl Saver

There isn’t much difference between Teufelberger’s Fimbl Saver and that of the classic ring-to-ring friction saver. Both can be installed from the ground with the aid of a throw line and patience. They both are adjustable thanks to the additional prusik and ring/thimble combo. Why does the need for adjustability exist, don’t they just both lay over the branch union? Well, yes and no for the following reasons.

When using a fixed ring-to-ring, it will drape, but if you have a long friction saver you may well be under the branch union you have decided to tie-into in order to maintain a good rope angle. It may not seem like much, but you might come to find out that those extra inches were needed. The adjustable prusik gives the climber the ability to decide when it’s convenient to have a long system.
Ascending or working a spar. Yeah, I’ve mentioned this plenty of times but that’s only because I am a firm believer of being tied in properly on spars. Having trained spar rescue, it is an eye opener and the realization that came with it; how time consuming this specific rescue can become if there is no primary system for the victim to descend on. Take your adjustable friction saver, whip around the spar and make sure the rings are spread five-to-seven inches when loaded! This creates a cinch anchor on the spar (if the rings continue to touch, the cinch factor is not present).

Teufelberger’s Fimble Saver is not meant for SEWN eyes, the huge clunky terminations done by industrial sewing machines. Splices and SpLife terminations are best. Being a canopy anchor enthusiast, installing the Fimbl Saver from the ground is a plus but I can do that with rings too. The difference; the Fimbl Saver can knot block on either the big or small thimbles. I discovered this by accident during a large prune job; upon retrieval I noticed I had blocked off on the big thimble, but it led to my discovery.


Teufelberger Pulleysaver

Have you used a pulley to climb MOVING ROPE? If you haven’t, I implore you to do so! So smooth, it’s stupid! The Pulleysaver is meant to be used in a moving rope configuration. To date, I have not heard Teufelberger give a thumbs up for a knot block configuration, so this means no SRT off this system, which is whatever. This friction saver can be configured three different ways. We’ll begin with a standard set:
Lengthen the system, whip it around the branch union and pass the pulley through the large soft eye before everything else. Pass your spliced eye through the thimble first and then pass it through the Pinto pulley. If you possess an Equaliza, you may use the Pulleysaver to tie-in between two different branch unions, if one branch union is not ideal. An important thing to note; keep the thimble spread far from the Pinto pulley. If the thimble is too close and it gains access into the pulley, it creates the potential to compromise the pulley or rope.
Cinch mode on a spar. Move the Pinto Prusik combo towards the soft eye and whip around the spar. Follow that by passing your spliced eye through the thimble and then through the Pinto pulley, make sure the pulley and the thimble are spaced out accordingly to create the cinch and so it does not creep into the pulley. In this mode, we remove the use of the soft eye. This configuration does come with a drawback; the thimble contains a core of Dyneema fibers that are not heat resistant. With that being stated, it may not be suitable for long descents/ burnouts.
Traditional spar cinch. Pulleysaver soft eye goes around the spar and Pinto pulley prusik goes through the soft eye. The glorious thing here, not needing to adjust spacing between rings! Spliced eye rope is installed traditionally. Upon retrieval, you may find the system slightly bound to the spar but no worries; just give your rope a good flick and it should come down!


Petzl Naja

This, along with a few others, has become a favorite for me! Fairly newer to the market; people asked why the need to reinvent the wheel? Different functions remember! Petzl’s Naja doesn’t include any rings or a large soft eye that can get snagged on retrieval. Instead, it has adopted a webbing sling just like its older relative, the Eject, making retrieval from a tight branch union simple and reducing hang ups. I won’t say completely removing hang ups because someone has probably gotten stuck somehow. It is compatible with both SRS and MRS climbing styles, provided it is configured correctly. Down below are some ways to use the NAJA:

Traditional with soft retrieve option. Flip the anchor webbing over the branch union, pass the body of the Naja through the sewn pocket (not exceeding 90 degrees), clip your rope through the Mino carabiner and finally, pass the rope through the Naja. If soft retrieval is desired, there is a separate black webbing that you can install a retrieval line to. This allows the user to control the system on the way down and pick it out of hang ups, if any.
SRS canopy anchor. Forewarning: this does involve some extra steps and another rope. Install your rope in the crown and anchor, either base or Alpine choke. Ascend and physically install the Naja along with the appropriate knot to block it off. Here’s the neat thing with setting it up this way.
You leave an access line in the event of an emergency.
You can soft retrieve the Naja with this separate leg of rope. Take your base anchor rope and tie an Alpine Butterfly, connect the Mino carabiner to that.
If you opted to ascend on an Alpine choke; on the retrieval leg tie another Alpine under it (like you would a Texas Tug) and connect it to the Mino carabiner. You see where this is headed right?! You won’t even need to connect the retrieval “egg” to your splice, pull your rope from the Naja and when you pull on the retrieval leg of rope, the Naja comes down with it and no worries of hanging up!
Since the Naja isn’t considered a choking anchor, here’s a tip on how to make it choke. Take the webbing sling and spin it around the stem to be choked but be sure to pass the end of the webbing over top of the first wrap. And, there you have it, a “choking” anchor. It is limited since the webbing that comes with the Naja isn’t too long.

Stationary redirect. I’m not a crazy fan of non-retrievable redirects, however they do have a place. To use it in a stationary redirect, one would install the Naja normally but then one would pass a bight through the Naja rather than the bitter or splice end and knot block the Naja. Be sure to capture the loop of the appropriate knot and the falling leg.

Utility Line Clearance Tree Trimming

Step into the world where nature and infrastructure collide, where arborists become artists, and the symphony of chainsaws harmonizes with the rustle of leaves. Utility line clearance tree trimming is not merely a job; it’s a delicate dance between human ingenuity and the untamed beauty of trees!

Maintaining a safe and reliable power supply is a crucial aspect of modern living, and one often overlooked element of this is utility line clearance tree trimming. Trees, while providing numerous benefits, can pose a significant threat to power lines, if not properly managed. Utility line clearance tree trimming is referred to as “The Dark Side” of Arboriculture and the trimmers are often referred to as “hacks”. This statement is far from the truth! There is a plethora of arborists that work in the Utility sector and try their hardest to prune according to ANSI A300 standards.

Electricity: we all rely on it to power up our homes, yet homeowners and “others” may overlook the dangers that are associated with working around these electrical conductors. I too was quick to judge, but this was before I understood the power lines and why the trimming is performed as it is. There is a method to the madness that I am now aware of. I will state that the saying, “Clearance not Appearance”, does not help the Utility line clearance trimmer’s case but it actually is true.

Utility line clearance tree trimmers are not hired by the homeowners, they are working for the Utility Provider. This is one big reason why they don’t like the Utility trimmers; that and the fact that the tree might look like it received a scalping when we are done with it. To prove that homeowners aren’t too fond of line clearance trimmers, let me paint this picture; late night is upon us while we work in a homeowner’s backyard, she was made aware that we would be there well into the night, clearing out a large tree that had caused an outage. I drew the short straw and worked the ground with our apprentice. Lights were set up as we continued to work into the night and the homeowner released two Doberman Pinschers! Immediately, I went into a Usain Bolt sprint!

Remember, the main goal for line clearance: clear the surrounding area near the power lines to prevent outages and reduce interference to the homeowner’s power supply as they enjoy watching Sunday night football. As stated before, plenty of us practice appropriate pruning standards, where applicable. On the other hand, utility trimmers along with Lineman (often work hand-in-hand), are praised as hero’s when it comes to large storm outages. I have worked with them during these large storms; working long hours, ensuring that it will be safe for the Lineman to raise power lines and to restore power. This process can be long and grueling, but they haul ass!

As with all tree trimming, assessment and planning is still required:

Survey the area around the power lines and identify the trees that pose risk.
Evaluate the distance between trees and power lines. There might be times where climbing the tree or working on it is not feasible and a shutdown must occur. The employer and the utility might not like it, but it is much preferred to a burial. This won’t be something as simple as removing a tree by a home; those things can be replaced, you however, cannot!
Learn to identify what hardware (e.g. fuse, ground leg, hot leg, jumper, lightning arrestor …) is being used on the utility pole. This will help identify what voltage you are working and to establish M.A.D. (minimum approach distance). It will also help you quickly determine when pole top hardware is faulty, broken, or missing. Please keep in mind, voltage running through the system may vary from region-to-region. Just because you can correctly identify the equipment does not mean the voltage is the same.
Finally, develop your attack plan.

Safety Measures:

Wear your PPE accordingly. I bring this up for an important reason, (other than it is necessary per OSHA, ANSI and more than likely your employer) avoid wearing polyester clothing around these electrical systems. If a flash occurs, it will get hot and that shiny polyester shirt will melt to your skin!
Something easily overlooked and that we ALL may have done, having used tools within M.A.D. I hate to break it to you (if you don’t already know) but apart from our body, our gear (including but not limited to, climbing lines, rigging lines, throw lines), tools, and equipment shall maintain M.A.D. as well.

Proper Equipment:

Something I can’t stress enough, use the correct equipment! For those of us in the utility sector, we must use insulated tools that meet the requirements and ensure they are still in good operating condition. Our pole pruners must undergo testing, there may be pole pruners that receive individual testing and those that are batch tested. The company you work for will have it written as to which they will need. So, if you intend on having a personal pruner, ask first.
Helmets, different makes, fits, styles. Yes, they all are designed to protect your head (some offer more), but in the line clearance industry, you must have a Class E helmet. Class E helmets undergo testing to withstand 20,000 volts of electrical current and to protect the user’s head from arc flashes and electrical shock.
If you can get an aerial unit to the work area, use it! Importantly, because the aerial lifts used in Utility have insulated portions, This does not make the user nor the equipment invincible.

What are your thoughts on Utility Line Clearance Tree Trimming?